Showing posts with label Actual Modeling. Show all posts

Sunday, September 30, 2007

Weathering Black: Ideas for Weathering the Hardest Color to Weather.

When my friends and I get together to discuss modeling, we almost always discuss weathering. And in our conversations, we always talk about how difficult it is to weather black locomotives and freight cars. How come it's so difficult? For starters, it's almost impossible to get rust colors to "show up" on a black surface. Simply painting surface rust and rust streaks over black is futile - the paint disappears unlike it does on lighter colors like yellow or even boxcar red. So before you weather black, you have to take extra steps to fade the black before you do any weathering work. Ok, follow along.

Getting Started

I wanted to paint Kato's new NW2 into Indiana Harbor Belt's early scheme. This scheme lasted at least until the late 70's, and a look through all the photos on http://www.rrpicturearchives.net show some pretty well-worn IHB prototypes. So in this example, we have the flexibility of mixing colors that custom painting affords. If your model is already painted and just needs weathering, the ideas in this article can also be used.

I start by stripping the Kato paint with 91% alcohol. It takes a few hours for the alcohol to break down the paint so that it can be brushed away with a toothbrush.

Layers of Grime

Typically, a black engine or freight car's will fade to a variety of gray/dirt/grime colors. It really depends on the prototype. It's possible to have a layer of green grime, tan dust, gray or brown dirt over top of a base coat of black or a faded black (maybe this is dark gray-again, it depends!). In the prototype photo that I chose to model, there was a fairly black base coat still showing through patches of gray, green, and tan.

Painting the Base Coat

I chose a slightly lighter color than black for a base coat - Polyscale Tarnished Black. If you have an already decorated model, you probably want to skip this step, since it'll cover up any heralds and road numbers. In this case, apply a fade coat to your model by painting with a thinned light tan or gray color. Note that in this photo, the shift away from true black is drastic. Subsequent additions of color will darken the model.

Adding "Dirty Blends"

The idea here is to apply overlapping colors with the airbrush, or if you choose, paint brush. Try a combination of dry brushing and washes. Remove some colors with 70% alcohol. Apply some surface rust.

Black washes allow you to tone down and blend colors that appear too bright. Since correction is so easy, it's better to go too light than too dark in the base coat.


Conclusion


By starting with a color lighter than black, any weathering you apply will "pop". Try these ideas out on hoppers and tank cars!

Tuesday, August 28, 2007

Post ModerN Modeling: Nothing is almost still too much

In my studies in college, we talked a lot about Post Modernism, the evolution and rejection of "modernism". It's tough to pin down a definition of "post modern", but this is the best I could pull from Wikipedia .

...postmodernism tends to refer to a cultural, intellectual, or artistic state lacking a clear central hierarchy or organizing principle and embodying extreme complexity, contradiction, ambiguity, diversity, and interconnectedness or interreferentiality.

I've realized that the rejection of traditional modeling concepts has driven me toward trying many different things in my modeling. While many traditional modelers will often try to pack as much "railroading" as possible into a space, I've been determined recently to do almost the exact opposite, and pack as little railroading into a space as possible.

I was presented many possibilities for my home layout when I began it. Many of these suggestions were that I needed "more" in the space. My good friend Lee has built an entire paper mill and junction on his layout (online at WMRYWesternlines.net) in the same square footage that I afforded to a ridge of trees.

This drive makes many things tricky, like incorporating any operational interest in a small space. I believe in making scenes as large as they deserve to be, and I find trying to scale these things down to manageable and modelable sizes is an even steeper challenge than I bet it is for many others out there.

Take my recent work on a oNeTRAK module for BANTRAK for example. I struggle to fit prototypical scenes into my door sized layout at home, but fitting something that I felt worth modeling into a 1'x4' module poised an even larger challenge. At first I thought about trying to model something very mundane, which is also part of what I feel makes my modeling thought post modern.

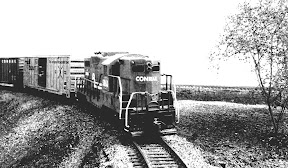
My first thought was just a stretch of track, on a slight embankment, like in Macungie PA or this scene at Strasburg. (Just look at how post modern THIS is, it's even of the rear of the engine!)

I had thought about doing something like a simple block signal. This is something that is barely ever done on a model railroad. It seems like every signal is there for an junction, an interlocking, or just for show. I thought that doing an intermediate, boring, block signal location would be a fun change of pace, and something novel. I may still revisit this in the future, as I still think it is an interesting idea.

After discussing the clubs needs though, I realized that what was more important was a "destination" scene. Somewhere that would make some sense for trains to be going to. I agonized with this though, because I'm not good at this type of thing. I'm too aware of the actual sizes of things in real life (thanks there Maps.Live.Com and your damn 3/4 view), and this was making coming up with a convincing concept difficult.

After pouring over some Conrail ZTS maps, I realized that the ideal "industry" to model wasn't an industry at all. It was an interchange. But even with this minimalist maximalist destination, I'm still struggling.

This all made me realized I'm really into modeling "nothing", that space between the scenes that everyone else is building. For every junction in real life, there are miles of boring straight track, that can be interesting in its details, but never gets any modeling attention. For every "hot spot" where 6 different lines all cross there are millions of more simple interlockings where it's a simple crossover between two tracks. For every bridge over a river, there are hundreds of more small bridges over creeks, and for each one of those, I'm betting there are 50 culverts over drainage ditches. I feel compelled to model more of these "mundane" things than the big ones. I'm not sure if this is just rebelliousness toward the modeling I was "brought up on" (and yes, I learned how to read with Model Railroader, and it took me a while to figure out that most of the world thought 2-8-2 actually meant negative eight), or maybe it's the desire to make a better representation of the real world in my modeling.

Either way, I can attest to this. It makes planning anything "operational" a real pain in the ass.

Thursday, March 15, 2007

Quick Photo: I'm starting to like the town side of the layout


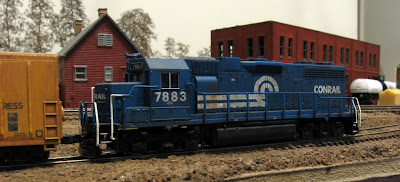
While shooting some photos of the mech reefers to show off on the Railwire Weathering Forum, I decided to take this grabber of 7883 posed on the team track on the town side of my current layout.
I was alway very nervous about getting this side of the layout right, but shots like this are starting to make me feel like I'm at least headed in the right direction.